OWASP® Dependency-Track is a powerful open-source platform that helps development, security and DevOps teams identify and reduce risk in their software supply chain. One of its lesser known yet immensely useful features is the ability to specify internal components. In this blog, we’ll explore the what, why, and how of internal components—plus walk you through a practical step-by-step configuration.
What Are Internal Components?
Internal components are those components (libraries, modules, packages, etc.) that your organization develops and maintains in-house. Dependency-Track lets you define these as “internal” so that they are not analyzed by external vulnerability intelligence services (e.g., OSS Index) or external repositories (e.g., Maven Central or npm.js).
By labeling a component as “internal,” you can:
- Skip external vulnerability analysis for proprietary code.
- Prevent unwanted disclosure of your internal namespaces to external services.
- Reduce noise in your vulnerability scanning results by focusing on third-party components that might have public CVEs.
In other words: Marking something “internal” means telling Dependency-Track: “don’t bother about those components because they are private.”
Why is it Important to Manage Internal Components?
Privacy and Security
Organizations often have proprietary code they’d rather keep confidential. By designating internal components, you prevent the possibility of inadvertently exposing internal namespaces, project names, or versioning details to third-party services.
Reducing False Positives
Sometimes, internal component naming might accidentally clash with open-source libraries. If your team named a library my-utils, there’s a chance an external data source might interpret that as something else. Marking this library as internal prevents confusion.
Performance and Efficiency
Scanning can be resource-intensive. If you already know you don’t need external vulnerability checks for your homegrown code, removing those from scans speeds up your pipeline, making your overall process more efficient.
Better Management and Visibility
When you label certain components as internal, you can more easily differentiate them from third-party components in your portfolio. This approach simplifies tracking, reporting, and understanding exactly which parts of your software stack are proprietary—and which rely on third-party code. That clear distinction not only improves visibility but also ensures your organization can apply the right security, licensing, and compliance measures for each type of component.
Real-Life Use Cases
Use Case 1: Large Enterprise with Multiple Internal Libraries
Imagine a major financial organization with dozens of microservices, each using a shared internal library to handle domain-specific functionality (e.g., financial calculations). These libraries aren’t open source and have unique naming conventions that won’t match public packages. By marking them as internal:
- The external scanning services won’t check them.
- The enterprise can rely on internal bug bounty programs, code reviews, and static analysis to manage risk.
Use Case 2: Software Startup Protecting Intellectual Property
A small startup might build proprietary algorithms or data processing frameworks that give them a competitive edge. They don’t want the names of these libraries disclosed to public sources. By defining them as internal:
- They keep the libraries private.
- They avoid the risk of accidentally leaking the libraries’ names or versions.
Use Case 3: Hybrid Model with Commercial & Internal Libraries
Organizations often use a blend of commercial, open-source, and internal libraries. Sometimes, internal libraries are clones or forks of open-source components but heavily modified for internal use. In this scenario:
- Marking them as internal helps avoid conflicting vulnerability information from external sources.
- Teams can maintain their internal patches and track vulnerabilities privately.
How to Configure Internal Components
Let’s dive into the step-by-step process for configuring internal components in Dependency-Track.
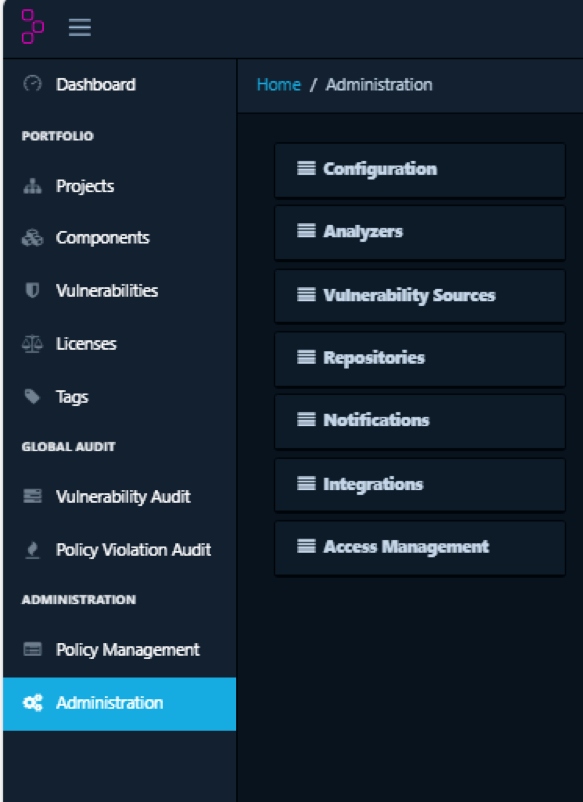
1. Navigate to “Administration”.

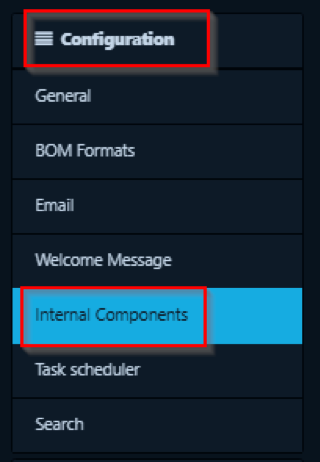
2. Click “Configuration” -> “Internal Components”.

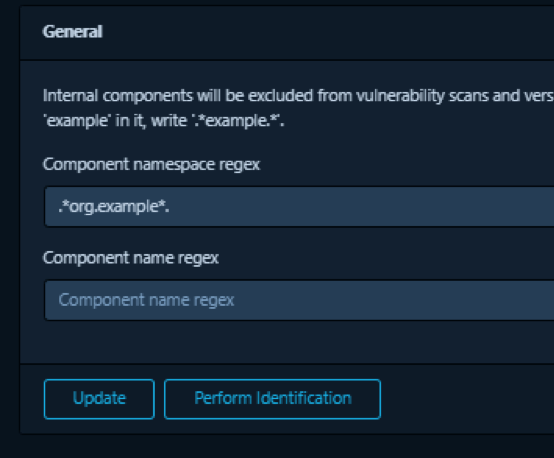
3. Set a regex for Component namespace (identifies internal components by namespace, often called ‘group’, ‘organization’, or ‘vendor’) or Component name (identifies internal components by name), in this example we will use “.*org.example*.” is namespace regex to identify internal components.

4. Click “Update” to save the setting and click “Perform identification”.

5. Navigate to the project that contains internal components and check the “Internal” column label.

Additional Tips & Best Practices
Keep Namespaces Consistent
Ensuring your internal projects follow a common namespace convention (like com.mycompany.project) makes it straightforward to configure them as internal.
Use a Shared Registry (Optional)
If you have a private Maven repository or an internal npm registry, consider using the same namespace definitions or naming conventions there. Consistency across all your toolchains keeps everything streamlined.
Summary
Defining internal components in Dependency-Track is a powerful way to maintain confidentiality and focus your vulnerability analysis where it’s most needed. Whether you’re part of a large enterprise, a startup, or any organization that values privacy and efficiency, this feature can streamline your security processes, improve performance and prevent accidental leakage of sensitive data.
